lunedì 11 agosto 2014

Tele dipinte / Paintings

È passato un pò di tempo dall'ultimo post tuttavia ho continuato a sperimentare nuove tecniche e stili. 
Le tele mostrate qui di seguito sono state realizzate con colori per pittura parietale e stucchi. Il colore dominante è il rosso, fanno da sfondo l'argento e il marrone bronzato. 

Some time has passed since my last post but I've been esperimenting with new styles and techniques. 
The following pictures are made with wall colours and plaster.
The main colour is red and the surrounding tones are silver and bronzed brown. 


mercoledì 11 settembre 2013

Airbrush / Aerografie

Una delle mie tante passioni é l'aerografo...
Avevo un vecchissimo casco che é stato completamente rimesso a nuovo..

One of my favourite hobbies is the Airbrush
Let's look at this old motorcycle helmet ..it seems back new after the Airbrush magic touch...

venerdì 6 settembre 2013

Ricordi di fanciullezza...Looking back to childhood

Rovistando tra vecchi ricordi ho ritrovato un quadretto che avevo fatto parecchio tempo fa...
Lo condivido qui con voi...
I'd like to show you part of my past life... This is what I found in my old dusty desk drawer...
A bit of childhood memories...


lunedì 26 agosto 2013

Fiori di carta*** Paper flowers

Volete un incarto regalo molto elegante ed originale?...
Ecco a voi un tutorial molto semplice per realizzare dei delicatissimi fiori di carta e tulle.
Occorrente:
- Carta di riso di vario spessore
- cartone
- tulle bianco
- strass
- forbici
- spugna
- colla a caldo
- penna

Ritagliate sul cartone la sagoma di 2 fiori di grandezze differenti.
Una volta che avrete il vostro modello in cartone utilizzatelo per ritagliare a misura la delicatissima carta di riso e il tulle ( FIG.1).
Prendete la spugna e posizionatevi sopra uno dei fiori precedentemente ritagliati e con la punta arrotondata di una penna date movimento al fiore incurvando i petali. (FIG.2, FIG.3)
Posizionate i vari strati uno sopra l'altro fissandoli con la colla a caldo e terminate la decorazione del fiore con uno strass al centro dei petali. (FIG.4).
A questo punto attaccate i vostri fiori di carta sul vostro pacco regalo. Se volete, arricchiteli con qualche nastrino alla base.
Buon regalo!!!


Do you need an elegant and special gift wrapping?
I'm so glad to share with you this super cute turorial for making delicate paper flowers. They are incredibly easy to make and can have a number of great uses, such as gift decorations or party decor.
Materials required:
- rice Paper in various shapes, sizes and composition.
- cardboard
- white tulle
- strass
-scissors
- foam
- hot glue
- pen

Make your cardboard flower shapes which will be your guide for both the rice Paper and the white tulle ( Picture. 1)
Once you have cut out the shapes from the paper, lay your petal cutout on a piece of foam and gently run the large end of a ball tool ( or round pen ) around the edges of each petal to thin them and add a bit of ruffling.
Next, run the large ball tip up the center of each petal to give it a slightly and more realistic cupped shape.(Pictures 2-3)
It is now time to glue each layer of petals, adding a little strass in the centre (Picture. 4)
You can now place this wonderful flower on your special gift wrapping!!! ;-) (Pictures 5-6)


domenica 21 luglio 2013

Crostata in fiore

Per realizzare questa dolcissima crostata in fiore vi occorre:
Impasto per crostata ( seguite la vostra ricetta preferita)
Stampino ad espulsione a forma di fiore.

Prendete il vostro impasto e dividetelo in due metà.
Con la prima parte foderate la vostra teglia e ricoprite la pasta con marmellata. ( preferibilmente scura).
Stendete la seconda parte d'impasto e ricavate tanti fiori di pasta che metterete da parte.
Prendete l'impasto intagliato e facendo molta attenzione spostatelo sopra la prima parte di crostata e rifinite i bordi. ( consiglio di intagliare la pasta sopra un foglio di carta forno per facilitare lo spostamento della pasta evitando cosí spiacevoli rotture)
In ultimo posizionate i fiori di pasta e infornate per 30 min.
Questa crostata é un modo molto carino per fare un regalo semplice e raffinato.
;-)


Prepare your tart pastry following the directions specific to your recipe.
Divide your pastry dough into two half.
Take the first half and on a lightly floured work surface, roll out pastry dough into a circle about 2 inches larger than the diameter of the pan.
Move the pastry dough to the tart pan. To aid in transferring the pastry to the pan, you can wrap the pastry around a rolling pin, center it over the pan, then unwrap the pastry and
place your favourite jam.
Now take the second half and roll it out again into a circle (picture 1)
With a flower shaped cookie cutter punch out the unbaked tart and arrange the flower shaped dough “cookies” on a side of the floured surface. (pictures 2 and 3). The remaining pastry dough should look like an embroidery.
Once you have more than 30 pieces of flower shaped cookies transfer the 'embroidery' on the first half of the tart .
Use the remaining flowers to decorate the top.
Bake in the preheated oven for 30 mins or until golden brown. Remove from the oven and leave to cool completely, do not eat while hot or you may burn your mouth, the jam stays hot for a long time.


domenica 5 maggio 2013

Foulard dipinto

Questo Foulard é stato dipinto a mano con colori per tessuti.
Successivamente é stato incartato utilizzando una scatola trasparente, nastrini e strass.

This hand painted silk scarf is a Wedding cadeau and it has been gift-wrapped in a trasparent box fully decorated with beige double-faced satin ribbons and topped with flower strasses and other sparkling and precious embellishments.

domenica 28 aprile 2013

Torta di Compleanno. Birthday cake

Ho realizzato questa dolce creazione in pasta di zucchero in occasione di un compleanno.
La torta era farcita con un kg di ganache alla nocciola e bagna al rum.
Quando la creatività si fa dolce basta iniziare ad impastare :-)

The following sugarpaste cake was a birthday present.
I moulded a ribbon to top the cake and I filled it with a kg of chocolate hazelnut ganache.
When creativity becomes sweet, take your sugarpaste, knead it to warm it up and give shape to your fantasy. :-)


domenica 7 aprile 2013

Centrotavola primaverile Spring centerpiece

Per realizzare il seguente centrotavola primaverile vi occorre: (FIG.1 e FIG. 2)

- Fiori veri, nel tutorial ho utilizzato tulipani giallo e arancione, nebbiolina e foglie verdi.
- spugna per fioristi
- pellicola trasparente
- recipiente con acqua
- recipiente in vetro di forma particolare
- ovetti di cioccolato
- nastrini vari
- filo zincato verde
- forbici
- tronchesine
- colla a caldo

Prendete la spugna per fioristi, assicuratevi che entri nel recipiente che avete scelto ed eventualmente sagomatela a misura. Successivamente immergetela in acqua, quando avrà assorbito l'acqua necessaria ricopritela completamente di pellicola trasparente. Posizionate all'interno del recipiente qualche nastrino sparso, successivamente la spugna e riempite l'intercapedine che si sarà formata tra la spugna e il vetro del recipiente con gli ovetti. (FIG.3)
A questo punto iniziate ad infilare i fiori, prima le foglie di contorno e poi in ultimo i fiori, regolandovi con le altezze di questi ultimi per dare una forma regolare alla composizione.
Prendete i fili zincati, modellateli ed incurvate l'estremità creando un occhiello che servirà per contenere il nastrino verde.(FIG.4) Successivamente attaccate gli ovetti al filo zincato utilizzando la colla a caldo.(FIG.5) In ultimo decorate il vaso con un nastro a piacere, realizzando un fiocco sul davanti.

If you want to dress up a table, making a Spring eye-catching centerpiece, follow these instructions.


Instructions

Cut the floral foam according to the size of the receptacle you will use for the floral design using a serrated knife. Avoid over-handling the floral foam; it is a delicate object and can crumble easily when mishandled, damaging its capillary system.

Soak the floral foam in water treated with a floral preservative or a few drops of bleach for at least 20 minutes. This will discourage the growth of harmful bacteria. Place the floral foam in a dish of water, and allow it to absorb the water on its own. Do not force the floral foam under the water.

Wrap the wet floral foam in plastic film and place it inside the container filling in the gap with chocolate eggs.
Use flowers with stems cut at a sharp angle to puncture the floral foam. This will ensure a tight seal around the flower stem and the transfer of water between the foam and flower. Try not to remove your flower stem once you place it, as doing so will compromise the integrity of the floral foam.

Take soft flex green craft wire and model it to obtain a curl shape, then stick chocolate eggs to it.
At the end decorate the vase with fabric ribbons.

Place the arrangement on a table, visible and beautiful. Water it every few days, when the foam starts to feel dry.


lunedì 1 aprile 2013

Restauro scatola porta gioie

Ho provato a restaurare una scatola porta gioie che ormai aveva la stoffa di rivestimento usurata ed impolverata.
La scatola é stata smontata, sfoderata e rivestita con imbottitura e stoffa in satin verde smeraldo.
Come ultimo tocco..ho impreziosito la scatola con perle e nastrini di raso bianco.

This old case has been restored with emerald green satin fabric, pearls and satin bands.
The following pictures show you the 'before' and 'after' views of the case.


sabato 23 marzo 2013

Uova di Pasqua fai da te!

Volete realizzare delle simpatiche e alternative uova di Pasqua?
Procuratevi ...
-alcuni palloncini di plastica
- carta crespa colorata
- ovetti di cioccolato
- 1 bottiglia di plastica
- forbici
- colla liquida

Riempite la bottiglia di plastica con gli ovetti che avete precedentemente comprato ( c.a. 50), assicuratevi che gli ovetti non siano troppo grandi e passino facilmente attraverso la strozzatura della bottiglia di plastica. (FIG.1)

Gonfiate un palloncino di plastica, poi sgonfiatelo e rigonfiatelo di nuovo ( questo procedimento lo renderà piú elastico e resistente alle rotture),(FIG.2)

Una volta gonfiato il palloncino unitelo velocemente alla bottiglia cercando di far fuoriuscire meno aria possibile. A questo punto inclinate la bottiglia in modo da far cadere gli ovetti nel palloncino ancora gonfio.(FIG.3)

Chiudete il palloncino e decorate a piacere con la carta crespa. (FIG.4) Potete tranquillamente incollare la carta crespa sul palloncino utilizzando della comune colla liquida.

N.b. Con questo procedimento potete inserire nel palloncino anche coriandoli, piccole sorprese e quanto la vostra fantasia vi suggerisce. In questo modo creerete un uovo di Pasqua alternativo e rispettoso dell'ambiente poiché l'aria contenuta nel palloncino non avrà viaggiato per centinaia di km e soprattutto comprerete SOLAMENTE ció che c'é di piú buono: la cioccolata!!! Buon divertimento e buona Pasqua.


domenica 10 marzo 2013

Pannello Illustrato

Questo pannello illustrato é stato realizzato per un'attività ludica.
Si tratta di un cartone dipinto con tempere miste a colla vinilica in modo da rendere il colore piú vivace e resistente.

I've drawn this panel for a party. The colour is bright, vibrant and intense because I've used tempera and vynilic glue. :-)


mercoledì 27 febbraio 2013

Borsa di lana

E' un pò che non mi collegavo, finalmento ho trovato un pochino di tempo per postarvi questa borsetta di lana.
It's been a while since my last post.
I've finally found some time to post my latest idea.
This cute wollen bag has been obtained from an old pullover. :-)

martedì 5 febbraio 2013

Idea regalo Gift box

-Si avvicina San Valentino e non sapete come incartare il vostro regalo.
Ecco un'idea semplice ed economica.
St. Valentine's day is coming and you don't have any wrapping ready! Don't worry, all you need is a cardboard box and some pages of your favourite clothes catalogue.

-Prendete alcuni fogli di riviste ( spesso in alcuni cataloghi di scarpe o abiti si trovano alcune pagine che non contengono articoli pubblicizzati ma solamente dei bellissimi sfondi) e una scatola di cartone.

Take the clothes catalogue and choose the pages without items.
Cut them to cover your cardboard box which has been previously opened. ( you just need to open all the seams and to lay the box out flat).
Paste the pages on the box and then fold the box back into its original shape.
Use satin or velvet ribbons to add colours to your box and at last put your precious gift inside. That's it!!!
The cadeau is ready!

-Aprite la scatola e ritagliate i fogli in modo da ricoprire la superficie visibile della scatola.
Attaccate i fogli con colla a caldo o colla vinilica e riassemblate la scatola di cartone.
Decorate con nastrini a piacere.
Ed ecco la vostra scatola cadeau!


venerdì 1 febbraio 2013

British style

Una vecchia maglietta é diventata un modernissimo cuscino british style.

I've turned a very old t-shirt into a perfect british style pillow.

giovedì 31 gennaio 2013

Apron

Chi non ha a casa un paio di vecchi jeans?
Vi suggerisco un modo simpatico per riutilizzarli:
Ecco a voi un grembiulino resistentissimo e due presine a forma di cuoricino.


I'm quite sure that you have a pair of jeans that you don't wear anymore.
What do you think about a jeans apron and a pair of heart-shaped pot holders?


Necklace

Alcune palline di legno,del cotone beige e delle perline bianche hanno dato vita a questa delicatissima collana.
Gli orecchini sono stati realizzati attaccando le farfalline ad un supporto preesistente.

A simple beige cotton thread has been the 'fil rouge' of this delicate necklace.
It has given shape to five butterfly. Some of them are softly landed on two earrings.


martedì 29 gennaio 2013

Christmas tree

Ricordi del natale appena passato.
Palline in polistirolo rivestite di stoffa.

Christmas has gone but not its memory.
Here you can see some polystyrene balls which are covered with brown cloth.


Segnaposti

Queste rose sono state ricavate da un pezzo di stoffa e poi assemblate con confetti per fungere da segnaposto.

These roses were made out of a piece of silk cloth and they served as place cards during the wedding.

Tableau de Mariage

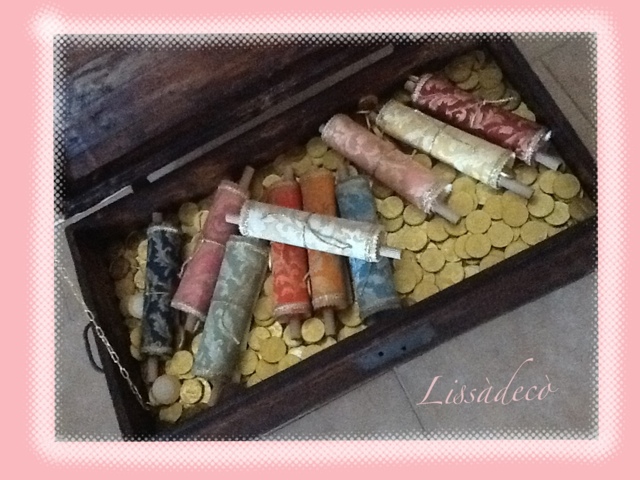
Ho recuperato e ristrutturato un vecchio baule che é diventato il contenitore di alcune pergamene colorate nelle quali gli invitati potevano leggere il nome del loro tavolo.

I've found and restored an old trunk which has been the natural setting of 10 highly coloured parchments.
By unrolling them, the wedding guests could see their names and their tables easily.
The trunk was full of chocolate gold coins.


lunedì 28 gennaio 2013

Wedding Cakes

In occasione di un matrimonio ho realizzato queste tortine in pasta di zucchero che sono diventate delle piccole dolci partecipazioni.

In order to announce a wedding day, I made these small and sweet wedding cakes.